
DIY Board and Batten Master Bedroom refresh
What does a wife do when her husband is out of town for 3 days??? Play indoors of course! My husband who is the lover of DIY’s, NOT! was out of town for 3 days and I figured this would be the perfect opportunity to tackle this DIY Board and Batten project while he was away.
Why did I wait so long?
This is something I have been wanting to do for the last year, however deciding on the specific design of DIY Board and Batten (there are lots, check Pinterest!) and how I was going to achieve this and not have my life in disarray for a few days took some planning. There are many DIY Board and Batten styles from classic to geometric, but I felt that with the style of our home, the classic style would be best.

Breaking down the materials
In my entryway and family room, I used primed MDF strips for the DIY Board and Batten projects I installed, so I figured it would be best to use the same material for the bedroom. I had considered using Lattice strips as I have seen many others do since they are only ¼” thick and have a thinner profile against the wall, however at $7.39 each it would have cost over $400 just for the lattice. I’m not sure where others are finding them because they have stated they have completed a room for $160.00. The total cost of this project including all supplies and paint $311.10. This included purchasing enough material that I could also trim out 3 of the doors in our bedroom.
For around $25/each, you can also purchase 4’x8′ MDF sheets and rip them yourself for DIY Board and Batten which I considered in an effort to save money, but honestly, the chance of me getting all of the boards straight was slim to none and I only had 3 days!
*As with every project I learn from my mistakes, so the steps you see below are how I SHOULD HAVE DONE IT, even though they might not be the order shown in the video below*
*Also note, that if it was in the budget I would have used premium pine instead of MDF, refer to step 6 below to see why*
DIY Board and Batten Materials used:
- MDF (I have pictures below with the actual products)
- Caulk
- Wood Putty
- Baby Wipes
- Nail gun
- Level
- Sander
- Paint (if you are using raw wood you will need to prime before painting)
DIY Board and Batten Steps:
STEP 1:
If you are planning on replacing the baseboard remove the existing boards. I removed ours and used 3.5″ MDF.
**IF YOU ARE NOT REPLACING YOUR BASEBOARDS AND HAVE A THINNER BASEBOARD THAN THE MATERIAL YOU ARE USING FOR BOARD AND BATTEN, I HAVE INCLUDED A VIDEO BELOW TO SHOW YOU HOW TO CUT IT**
STEP 2:
Install baseboards, header, and header trim around the perimeter of your room and caulk them. It is much easier to do this prior to installing the vertical strips. As you will see in the video I did not do this until the second day and it was a time saver. The total height including the header trim in my room is 64.5″
STEP 3:
Install vertical strips. I wanted mine 12″ apart and cut a 12″ piece of MDF that I used as my spacer. You will need a decent size level as you make your way down the wall from the header to the baseboard. The majority of my vertical strips are “around”, 58″. However, are our walls are not level. Although the header and baseboards are level, some of my strips needed to be cut shorter than 58″. Do not cut all your vertical strips at the same time thinking they will work. It took me over an hour to cut for the last wall behind my bed because every singe strip required a different measurement.
STEP 4:
Apply wood putty to where the vertical strips meet the header and footer, along with all the nail holes. Do you use CAULK!! Caulk will shrink over time and it is a noticeable difference where the wood pieces meet. You want it to look as seamless as possible. If you follow me on Instagram you may have seen in my Board and Batten highlight for the family room I initially used caulk, then a year later I went back and fixed it with wood putty. **side note** I have not used spackle, so I am unsure if it would yield the same results.


On the left you see where I used only caulk where the boards meet. Over time the caulk shrunk. A year later I fixed it using wood putty and the difference is incredible.
STEP 5:
Caulk both sides of vertical strips and wipe off with baby wipes (I went through 4 tubes of caulk for this room) I didn’t have baby wipes until day 3 and it was a huge time saver. If you plan to do an entire room, do yourself a favor and purchase the largest baby wipe pack you can, because you will need them later.
STEP 6:
Once the wood putty is dry, sand. *Disclaimer* with MDF you have to be careful. There is one area where two header boards meet and I put to much pressure when sanding and the MDF “pilled” in that area (looks kind of like when you run your finger over wet paper and little chunks come off) I haven’t figured out how to fix it, but it’s noticeable after painting. I will update this post once I do some more research on a fix.
Also, note that I could have purchased a long enough piece that would not require a seam. However, my husband was out of town with the truck leaving me with my SUV to transport.
STEP 7:
Vacuum walls with attachment to get the sanding dust off, then wipe with baby wipes. Vacuuming will not be enough! If you watch the video you can see where I first used a very small hand broom (purchased from Grove Collaborative a few months ago) to sweep off the baseboard dust. Then I vacuumed the walls and floors near the baseboard.
STEP 8:
Paint. If you watch the video you will see the first 60% of the room I painted prior to installing the vertical strips. This was a waste of paint because after caulking I had to still paint two coats, so save yourself some paint. I painted 3 boxes at a time, first cutting in with a brush and painting the inside of the MDF then rolling the wall. As a reminder with any kind of painting, any time you dip your roller it should cover 3 square feet.
Testing paint colors
It took me 4 days to decide on a color and looking at it during different times of the day. When I did a poll on Instagram 99% voted Benjamin Moore Pale Oak which is the second lightest color you see and also in the largest picture below. However, at night it looks like an ashy pink. Benjamin Moore Old Prairie is the lightest color and the one I went with (middle of picture 1, next to the picture frame in picture 2, far-right in picture 3) In the evenings it takes on slight soft gray/green (we have an east-facing room) and in the early morning light, it’s a dirty white which goes perfect with the Sherwin Williams Alabaster on the upper portion of the walls.


DIY Board and Batten Materials Used


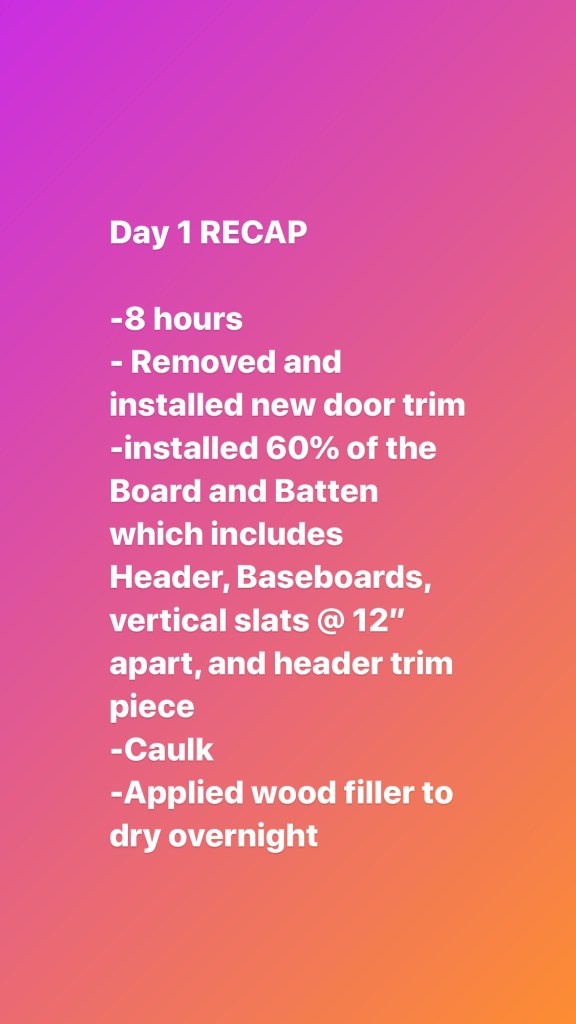
DIY Board and Batten: Day 1


DIY Board and Batten: Day 2


DIY Board and Batten: Day 3


In an ideal world, I would have moved all of the furniture out of the room, before starting this. We live in a smaller home it’s very challenging to find a place to put it all.
Complete video of install
Sources
The nightstands are an Ikea Hack on the Tarva Dresser that you can find here, where I painted and shortened the legs giving them an MCM angle

The print above the bed is from bffprintshop.com. I had it printed in a 20″x30″ at Costco and used an Ikea frame that I spray painted Gold.

Nightstand art is from Juniperprintshop.com. Flight and Scarlett


The blanket at the end of the bed is from The Loomia and is called Naz.


This is the lamp I have. Target had it for awhile @ $55, but it has been sold out for quite some time. I purchased mine through Amazon ($79) and then purchased the Bell Lamp Shade from Target shown below.
Just for fun, here’s a look at my bedroom over the years


10 Comments
Jamie
Hi there. Love your board and batten. Can you clarify something for me. You used 1×4 for the baseboard. 1×2 for vertical strips. 1×3 horizontally on top of the strips. And the 1×6 is the very top piece that sort of makes a small shelf?
Cristina
Thank you! For the very top that makes a little “shelf” I used a 1×2, the same as the vertical strips. It’s not large enough to rest anything larger than a TV remote on top of it, but gives it a finished look
For my family room I did not add the 1×2 at the top
Amanda
I was just wondering what the wall color was above the board and batten?
Cristina
SW Alabaster.
Lindsay
I love your room! Do you mind sharing here you go your bedframe?
Cristina
Sorry for the delay in responding. I purchased from Overstock
https://rstyle.me/+iMngXTwgc9HgPKfIhJM5Ow
Natalie Kinsey
Hi! Where did you get all your decorative pillows on the bed? That’s exactly what I’m looking for!
Cristina
From hacknerhome.com. If you look on her website under Pillow Covers and then Pillow groupings it’s on page 3 called “Cristina”. Make sure to check her out on Instagram!
dane
how tall is the board and batten?
Cristina
From floor it is 65”. The baseboard is 4” and the header is 3” and on top of the header is the almost 1” piece of MDF turned sideways. It’s the same MDF used for the vertical slats